Stage Plot Pro Team /
How to Build a Complete Stage Plot in Five Minutes Flat
Start from a template, drag your gear into place, and export a PDF before your coffee gets cold. Here is the fastest path through the Stage Plot Pro editor.
Why this should not take an hour
We built the editor around one rule: placing gear on a stage should be the
only thing you have to think about. You should not have to number channels
by hand, look up what a DI box does to your input count, or redraw a wedge
icon because you moved it two feet. Here is the actual fastest path from a
blank tab to a PDF you can send to a venue.
Minute one: pick a starting point
Open the Stage Plot Pro editor and pick a template close to
your real lineup instead of starting from an empty stage. If you run a
four piece with two guitars, bass, and drums, the four piece rock
band template already has a
sensible layout: drums upstage centre, amps on the backline, vocals out
front. Running a stripped down duo instead? The acoustic
duo template starts you from two mic
stands and a DI, not a blank canvas. Loading a template does not lock
anything in. It places icons you can move, delete, or add to.
Minutes two and three: fix it to match your actual stage
This is the only real work in the whole process, and it is fast because you
are adjusting positions, not creating anything from scratch. Drag the
guitar amp closer to where your guitarist actually stands. Add a second
monitor wedge if you run one per performer instead of shared wedges. Swap
a mic icon if your vocalist uses a handheld instead of the stand mic in the
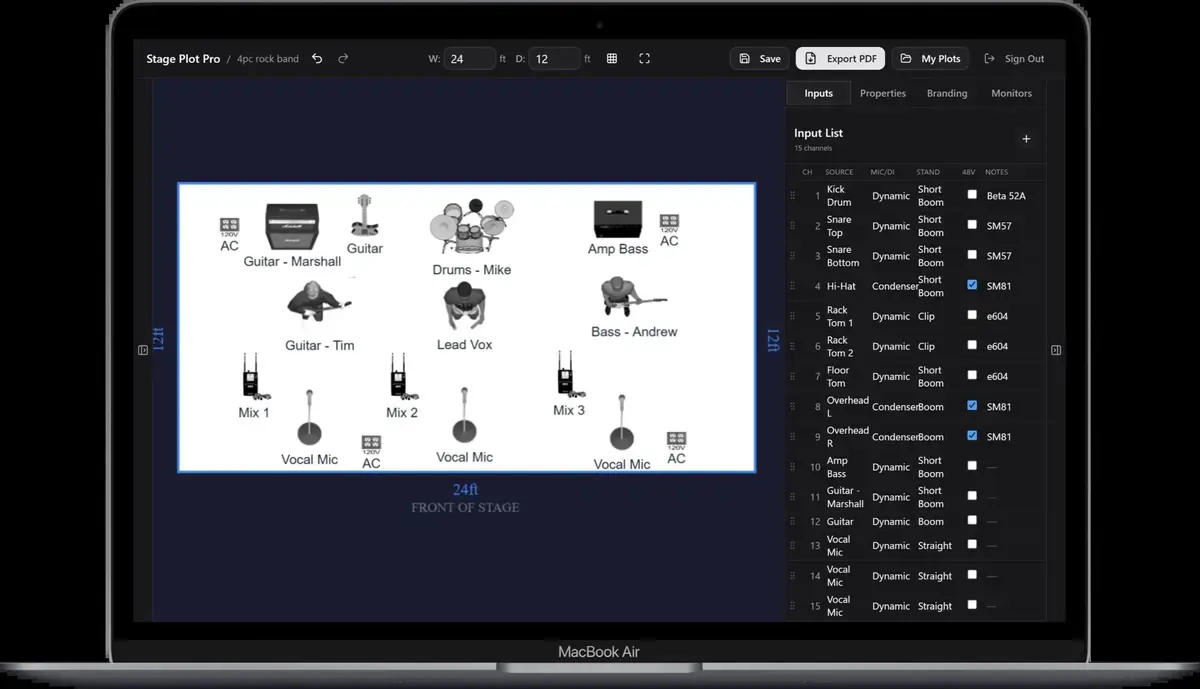
template. Every icon you place or move updates two things behind the
scenes: the input list, which tracks channel count and mic type per item,
and the monitor mixes panel, which picks up any Monitors category icon
automatically and starts building a mix for it.
Minute four: check the input list, not the stage
Switch over to the input list panel and scan it top to bottom. This is
where mistakes actually get caught, not on the visual canvas. Confirm the
channel count matches what you expect, check that phantom power is flagged
correctly on your condenser mics, and rename anything the auto-generated
label got wrong, like a specific DI brand or a mic model your engineer
will recognize. The list is editable cell by cell, so a correction takes a
click, not a rebuild.
Minute five: export and send it
Export a PDF with your band's name, logo, and accent colour, stage plot on
one page and input list on the next. If the venue runs a Behringer X32 or
Midas M32, or an Allen & Heath dLive or Avantis, you can also generate a
console file directly from the same input list, which we cover in detail
in console exports behind the scenes.
Either way, you are handing the engineer something they can patch from on
sight instead of a photo of last year's plot.
When five minutes turns into two
Once you have built a plot for your actual lineup, save it. Next time you
book a gig with the same band, you are not starting from a template at all,
you are duplicating your own saved plot and adjusting for the room. That is
the real speed gain: the first plot takes five minutes, every one after
that takes two. If you want a deeper walkthrough of the build logic itself,
our how to make a stage plot guide
covers the same ground in more depth.
A real-world production scenario
Five minutes is realistic only when the band already knows its lineup and uses a template as a starting structure. The goal is not to draw every cable or design the PA. It is to produce a readable overhead map that agrees with a basic input list. The shortcut is preparation: consistent performer names, a known stage orientation, and a short inventory of the sources that actually create console channels.
A repeatable workflow
- Choose the closest lineup template and immediately set the real stage width, depth, and downstage orientation.
- Place performers first, then the immovable backline: drums, keyboard rigs, amplifiers, playback station, and large percussion.
- Add vocal microphones, DI points, and monitor positions at the performer who uses them.
- Review the generated inputs and fix names, stereo pairs, monitor-only channels, and items that do not create audio channels.
- Export the PDF, open it once at normal screen size, and confirm that the smallest labels remain readable.
The order matters. It moves from known facts to local decisions and leaves the room-dependent work with the people who can hear and inspect the system. Skipping directly to preferences is how a polished document becomes difficult to execute.
Decisions to settle before the show
- Does the plot show audience perspective or performer perspective?
- Are amplifier positions requests or simply where the band usually puts them?
- Which connections does the artist provide through the stage box?
- Is this revision for the full band, a reduced lineup, or a festival version?
If an answer depends on the venue, write the question and the preferred solution instead of presenting an assumption as a requirement. That gives production something concrete to confirm and prevents avoidable surprises at load-in.
Make the handoff unambiguous
Speed is valuable only when the document survives a two-minute production review. Before sending, compare the player count, vocal count, DI count, monitor count, and input-list total. If those five numbers agree, the fast plot is probably useful. If they do not, another two minutes of correction will save far more time at load-in.
The final package should survive a quick read on a phone, a printed copy at the stage rack, and a conversation over intercom. Use current filenames, readable labels, and the same terminology everywhere. When the documents disagree, the crew has to stop and discover which version reflects the real show.
Prove the plan before load-in
Do a tabletop check with someone who did not build the document. Give them two minutes and ask them to explain the physical setup, count the required inputs and outputs, identify artist-supplied gear, and point to the first likely production question. Do not coach them through it. Every pause exposes a label, assumption, or missing relationship that will also slow a venue crew.
Then trace the workflow in signal-flow order. Start with the source, follow the connection to the stage input, confirm the console channel or destination, and finish at the required PA, monitor, recording, or show-control output. This catches a different class of mistake than proofreading. A document can be spelled perfectly while describing an impossible or incomplete route.
Control revisions like production equipment
Keep one master version, create deliberate venue-specific copies, and place the revision date where it remains visible after printing or separating pages. A descriptive filename with the band name, document type, and ISO date is easier to trust than a file called final-v2-new. When a last-minute change is unavoidable, state exactly what changed in the email instead of forcing production to compare two PDFs.
After the show, update the master only when the change will travel. A one-night local substitution belongs in the venue notes; a new keyboard, vocalist, playback output, or monitor system belongs in the master. That discipline keeps useful local compromises from quietly becoming false requirements on every future date.
Final preflight checklist
- Confirm the lineup, stage orientation, source count, monitor count, and ownership of all artist-supplied equipment.
- Compare the plot, input list, and rider for the same names and revision date.
- Identify substitutions and fallbacks before they become time-critical.
- Open every exported file once and check that text, images, and page breaks remain readable.
- Send one technical contact who can answer production questions promptly.